
|
<Root level>Control Panel
|
Send comments on this topic |
 Control Panel
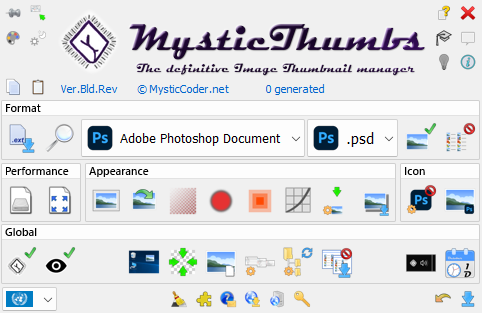
The control panel is where you adjust settings, enable / disable file formats and adjust global options.
 The most important thing to keep in mind when using the control panel is that it uses a state machine in order to make changes.
•This means that when you make changes to a selected set of file formats / extensions settings and are happy with the changes, you have to apply the changes to the system using the Apply ![]() button (bottom right corner).
button (bottom right corner).
•If you make a mistake before applying changes you can use the Undo ![]() button back to the most recently applied state.
button back to the most recently applied state.
The basic concept of making changes is:
oWork from top left to bottom right. Think of the thumbnail generation filtering down from each option to the next.
oSelect the level of change you wish to make using the Apply Changes ![]()
![]()
![]() button (top left).
button (top left).
oSelect all formats or the file format / extension you wish to make a change to in the Format group. This gives you the required granularity for subsequent changes required.
oOptionally change performance options group to disable large files and improve thumbnail generation speed.
oChange thumbnail appearance group options such as transparency control, embedded thumbnail extraction, filtering and thumbnail adornment, that will be applied to the selected set of formats / extensions.
oWhen changes are made to an option, a small Apply icon ![]() is overlaid on the bottom right of the option to indicate which options have been modified and are ready to apply.
is overlaid on the bottom right of the option to indicate which options have been modified and are ready to apply.
oEnable / disable and override thumbnail icon overlays as desired in the Icon group.
oWhen in File format or All formats mode, any option that has multiple states has an indeterminate state icon ![]() overlaid on the button, or instead of the usual graphic.
overlaid on the button, or instead of the usual graphic.
oApply ![]() changes to the system and optionally refresh open Explorer windows by holding the [Control] key or by having the global Apply refreshes open Explorers option enabled.
changes to the system and optionally refresh open Explorer windows by holding the [Control] key or by having the global Apply refreshes open Explorers option enabled.
The global group options are not part of the individual thumbnail state machine generation options and are changed immediately when modified. Apply is not required.
The bottom row Shelf icons contain tools such as language selection, thumbnail cache clearing, plugins, on-line support queries, checking for updates, network and registration options as well as the undo and apply buttons.
The control panel and all other interfaces are DPI compliant, so they scale nicely for High DPI displays such as 4K monitors.
Launching the Control Panel
The control panel can be opened in a number of ways.
•Double clicking or by using the context menu of the Tray Application
•Using the context menu of the Shell Extension (right click on desktop and choose "Thumbnail control"
•Using the entries in the system control panel.
•Windows 7 or later - Thumbnail Options in 'Appearance and Personalization' or 'Programs'
Click on a button or control to go to it's description
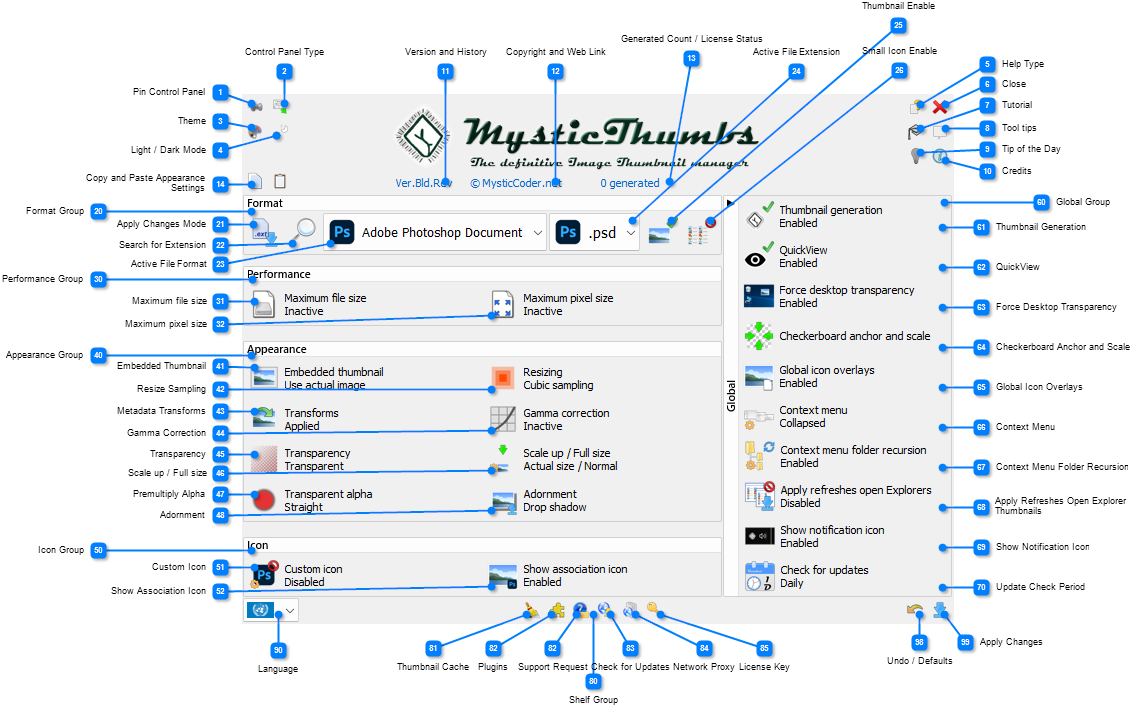
How to use the control panel - the basics
Single state buttons such as the smaller shelf buttons at the bottom, clicking it will perform it's action.
Multi-state buttons with two or more states such as Transparency, left click toggles it's state forward, right click toggles it's state backward.
![]() Buttons with a gear icon on them. Double click to either change a multi-state button such as Scale up / Full size, or to open options settings relevant to that button, such as for Transparency when in Checkerboard mode to set and choose checkerboards.
Buttons with a gear icon on them. Double click to either change a multi-state button such as Scale up / Full size, or to open options settings relevant to that button, such as for Transparency when in Checkerboard mode to set and choose checkerboards.
![]() Default states. When a button state has changed from it's default, for example with Appearance modes, a dim red restore arrow
Default states. When a button state has changed from it's default, for example with Appearance modes, a dim red restore arrow ![]() is overlaid on it's top left indicating it is non-default. This enables you to control-click (using the keyboard control key) the button to reset it to it's default state. The current Apply Changes Mode is taken into consideration when resetting state so states can be reset for file extension, format or all file formats in a single click.
is overlaid on it's top left indicating it is non-default. This enables you to control-click (using the keyboard control key) the button to reset it to it's default state. The current Apply Changes Mode is taken into consideration when resetting state so states can be reset for file extension, format or all file formats in a single click.
•![]() Also see Undo / Defaults for loading defaults for all settings.
Also see Undo / Defaults for loading defaults for all settings.
Use this to make the control panel a top most window so it is always above all other windows whilst open. |
|
|
|
|
Custom themes can be created and shared by customizing the icons. |
|
|
|
Press to open the Theme Editor Dialog. This dialog is non-modal and can be kept open whilst using the control panel.
|
Switch between light, dark or system theme modes. |
|
|
|
|
Help can be opened for a specific item by either using the window help icon (? next to the close button) or by pressing F1 over a control.Press to enable context sensitive help. Then press a control to open the local or on-line help guide for the selected control. |
|
|
|
|
|
Tutorial mode. |
|
|
|
Tutorial mode helps train you in how to use the control panel.The tutorial will take you step by step through the control panel controls to teach you how each function works and how they work together to help fine tune your thumbnail experience.
|
Enable or disable the tool tip balloon help with this button. |
|
|
|
Click to toggle tooltip display on or off. Tooltips are always displayed over this button.
|
When enabled, a random tip of the day tutorial tooltip for one of the controls is displayed when the control panel opens. |
|
|
|
Enable this to help learn how to use the control panel.
|
Opens the credits view that displays program information, attributions and license information. |
|
|
|
|
The control panel shows the currently installed version. If there is any kind of installation error the version will be reported as *ERROR* indicating you may need to do a repair install or re-install. |
|
|
|
Clicking this hyperlink will open the version history page online for this version.
|
Displays program copyright. |
|
|
|
Clicking this will open the MysticThumbs online website.
|
When registered, shows the amount of thumbnails generated is also displayed here so you know just how useful MysticThumbs is.When not registered, shows the license evaluation or other status. |
|
|
|
Clicking this will open the MysticThumbs online website.
|
Copy settings from one file extension to others quickly. |
|
|
|
With file extension Apply to Mode enabled, you can mark an extension as a copy source for quickly copying the settings for that extension to another extension, file format (all extensions of) or to all file formats.
|
This is where you select the file formats or extensions that you want to make changes to, as well as what to apply changes to. |
|
|
|
|

This is the mode that determines the depth of changes made when adjusting settings.It is used for changing settings to all file formats or to extensions or all extensions of a file format without having to individually select each format and change them individually.
Subsequent state changes are applied to formats and extensions based on the state of this button. |
|
|
|
Example if you enable 'Apply to all' Example if you enable 'Apply to file format'
|
Select from all supported file extensions. |
|
|
|
With this button focused or with it's drop list open, scroll the list with the keyboard arrows or mouse wheel.Type the extension you require, or part of an extension. The best match will be highlighted.
|
Use this combo box to select the file format you want to adjust changes.If an application is installed and assigned to the file type then its icon is displayed for each file type. |
|
|
|
With this control focused or with it's drop list open, scroll the list with the keyboard arrows or mouse wheel.Type the format you require, or part of a format name. The best match will be highlighted.
|
Use this combo box to select specific extensions for the selected file format you want to adjust changes to.Each file format displays either its assigned override icon or the default icon for the file extension/type. |
|
|
|
With this control focused or with it's drop list open, scroll the list with the keyboard arrows or mouse wheel.Type the extension you require, or part of an extension. The best match will be highlighted.
|
Enable, disable or set to fallback to handle how generating thumbnails for this file format / extension thumbnails are handled. |
|
|
|
Toggles the thumbnail generation mode for the selected file format / extension.
•MysticThumbs will create a thumbnail with all settings for that file extension as set in the control panel.
•MysticThumbs will use the thumbnail provider of the system or the currently assigned application that opens the extension first. •This is the default for a number of file formats that the system already supports, such as JPEG, PNG, TIFF, BMP and Camera RAW. •If a fall back provider is used, no embellishments are applied to the thumbnail. That is to say, it is as if MysticThumbs was not installed. No appearance or performance options are used when creating the thumbnail. •
•MysticThumbs will still create a thumbnail but it will be the relevant icon for the file extension. |
|
|
|
Enable, disable or set to fallback this option to set how small icon thumbnail generation is handled for this file extension. |
|
|
|
Small Icon, List View and Details view modes that display using a small icon (usually 16x16 in standard DPI) will also generate thumbnails and store them in the system icon cache. The system icon cache can be erased when using the Clear Thumbnail Cache option.
•MysticThumbs creates an image instead of using the associated file extension icon for the extension. •
•MysticThumbs will use the icon handler of the system or the currently assigned application that opens the extension first. •Works similar to Thumbnail Mode. •Some applications, specifically Microsoft Office apps do not seem to operate correctly in this mode. Disable is the default for this reason. • •
•MysticThumbs is not used to generate small icons for the extension.
|
Performance options designed to limit the scope of generating thumbnails for large files. |
|
|
|
These options can be adjusted if required for slower computers that may struggle with files that are either very large images or have large memory footprints and can be changed on a file format or extension basis as required.
|

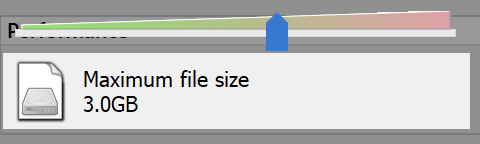
Select the maximum file size for the given file format. |
|
|
|
When adjusting you get a slider:
|
Select the maximum dimension for the given file format. |
|
|
|
When adjusting you get a slider:
If an image has more rows or columns (in pixels) than this value it will not be thumb-nailed unless it has an embedded thumbnail.Select Inactive to disable maximum dimension check.
|
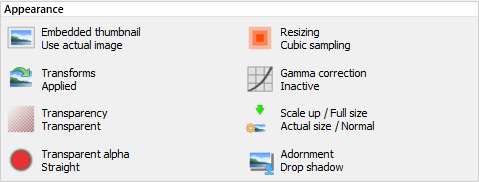
Options in this group control how thumbnails are to be rendered and can be changed on a file format or extension basis as required. |
|
|
|
|
Some files for example camera images may contain rotation or flip metadata to indicate the orientation of the image.In some cases you may not want this to be applied. This option is available for those file types to disable this transformation. |
|
|
|
|
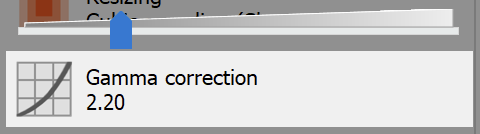
Some file formats are designed to, or look more correct with color correction. Gamma correction can be used for this purpose. |
|
|
|
When adjusting you get a slider:
Usually, most photographic type files such as RAW, JPEG etc. contain their own color correction settings and these are used when possible by MysticThumbs, however in some formats these are not supplied and the gamma setting can be useful to apply a specific gamma correction to these formats.
A value of 1.0 is default and a value of 2.2 is a common adjustment for photographic images.
|
Adjust transparency options for selected file types.It can be useful to use different transparency modes such as checkerboards to visualize the alpha channels of some pictures such as video game textures. |
|
|
|
|
Two options in one:•Scaling options: Scale small images up to requested thumbnail size •Full thumbnail options: Create a full size thumbnail of the requested size with various options. |
|
|
|
Two modes are modified with this button - Scale up and Full thumbnail.• Scale up (single click) - If an image is smaller than the requested thumbnail size, enabling scale up will scale the image to the requested thumbnail size maintaining aspect ratio.• Full thumbnail (double click) - Thumbnails are rendered to a square canvas the size of the requested thumbnail using the selected fill mode. The image is anchored to the center or corner of the canvas based on the checkerboard anchor setting.This can be useful for comparing images in Explorer.
Scaling options
|
Customize the icon overlay that is displayed on specific file formats and extensions.Usually any associated appication icon is overlaid on the bottom right of a thumbnail showing that application opens the file. These options can fine tune this. |
|
|
|
Usually, the icon overlay used for a file extension is taken from the default icon assigned by the application currently associated with that file extension.You can override this behavior and use a specific icon to help you more readily recognize your files when they are in thumbnail view.This is particularly useful when you have "Hide extensions for known file types" enabled in the Explorer folder options and the extension of file names are not displayed.
|

Custom icon enable and selection from file.This allows you to select and override a specific icon for file extension(s). |
|
|
|
Single click to enable or disable the icon overlay override option.
|
Show or hide associated application icon or overridden icon overlay. |
|
|
|
|
These buttons control various global options and toggles that determine the overall program flow. |
|
|
|
|
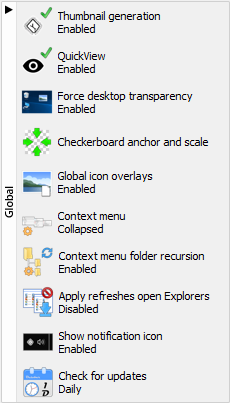
Enable or disable thumbnail generation globally. |
|
|
|
Click to enable or disable thumbnail generation for all supported MysticThumbs formats. This can be useful to temporarily gain performance in File Explorer if required, or perhaps to test for bugs.
|
Enable or disable QuickView in File Explorer. |
|
|
|
When enabled, press [Space Bar] on selected files in Explorer windows to open a QuickView window for each selected file.
QuickView is an integrated simple tool to allow you to quickly view any MysticThumbs supported file type without having to open associated applications.
Using the context menu within QuickView you can also adjust most of the visual states such as transparency as well as compare files.
|
Toggle forcing transparency with thumbnails on the desktop. |
|
|
|
Enabling this option will always produce a thumbnail with a transparent background for a file on the desktop, instead of the currently selected transparency mode for the file type of the image.
|
Adjust checkerboard anchor and scale for thumbnails generated with checkerboard transparency. |
|
|
|
When using checkerboard transparency, this option allows you to define the scale and origin for the checkerboard to be corner, side or center of the image or thumbnail.
Click on the desired anchor position to change the anchor for the checkerboard, click again on the existing anchor to change the scale.The scale is toggled between three scales.
|
Enable global icon overlays for all thumbnails. |
|
|
|
This is a system wide setting that effects all file types regardless of if they are handled by MysticThumbs.An application icon overlay is shown bottom right of a thumbnail for any file extension that has an application associated that can open them.
|
Explorer context menu mode. |
|
|
|
|
Context menu folder recursion mode. |
|
|
|
When refreshing thumbnails via the context menu in Explorer or applying folder level changes in Explorer, enabling this option will apply to all folders beneath the selected folders.
|
Enable or disable refreshing open File Explorer thumbnails when applying changes. |
|
|
|
When enabled, applying state changes will automatically update all open Windows Explorer windows for changed file types.
|
Shows or hides the notification icon (system tray). |
|
|
|
|
Enable to check for updates on a periodic basis. |
|
|
|
When a new update is available you will receive a notification.
|
Clears the thumbnail and/or the icon cache so all thumbnails will be recreated if their file type and extensions are enabled. |
|
|
|
Use this function to flush and recreate thumbnails and / or icons system wide.If you have problems with thumbnails being recreated for no apparent reason or have installed a new license key and want to refresh thumbnails then use this. All thumbnails and / or icons will be refreshed depending on your choice.MysticThumbs launches the "Disk Cleanup" Windows utility to perform the clear thumbnail cache to perform the operation.
Also see: Clear Cache Dialog
|
Create a new support request to email to the developer. |
|
|
|
Open a support query in your web browser to create a support request or ask for feature enhancements.You will receive a notification of a saved image of the control panel's current state which you may optionally attach to the support request. It is strongly advised you switch to a specific file format you may be having trouble with before beginning the support request so that support can inspect your current settings from this screen shot.
|
Manage custom plug-ins. |
|
|
|
Custom file format plugins are managed with the plugin dialog.Also see: Plugins Dialog
|
Check for updates. |
|
|
|
Checks for updates immediately and informs you if there is any new version available for download and will show you changes and options for downloading.
|
Set proxy settings for all Internet communication, including checking for updates, registering license keys. |
|
|
|
Also see: Proxy Settings Dialog
|
License management. |
|
|
|
You can view, enter and change your license and registration with the License Registration Dialog.
|
Language selection. |
|
|
|
The system user language is used by default, however you can force a supported language if desired.
Current supported languages are (this is subject to change):
Arabic, Chinese Simpled, Chinese Traditional, Dutch, English, French, German, Greek, Hebrew, Hindi, Italian, Japanese, Korean, Russian, Spanish, Swedish, Ukrainian.
|
Undo changes - Undo changes made since last apply. |
|
|
|
|
Apply current state changes to the system. |
|
|
|
|
|
Minimizes the control panel to the task bar. |
|
|
|
Hides the control panel in the task bar without closing it. Gain more screen real estate without closing the control panel. Click the taskbar button/icon to restore it back to visible. |
Copyright © MysticCoder Pty Ltd